If you want your own LED light strips, you will know that connecting them can be a piece of work, especially if you don’t have any technical knowledge. Don’t worry! This guide will tell you all about how to connect LED light strips.
What are LED Light Strips?

LED light setups have been getting more popular over the past few years. You can often see them as room decorations all over the internet.
You can see LED light is placed on the corner of the walls to serve as décor and light source. LED lights often come in bright colors or classic white.
Since they are often used as lining walls or furniture, cutting and connecting are sometimes part of the process. Today, we are here to help you with that.
How to Cut LED Light Strips?

Now that you’ve gone through the overview of the process of connecting your LED light strips, you might notice that you need to cut your light strips together.
Don’t fret! We also have a guide for you to follow
- First, you need to measure how much LED you will need. You can gauge the length with a measuring tape or use your LED lights directly.
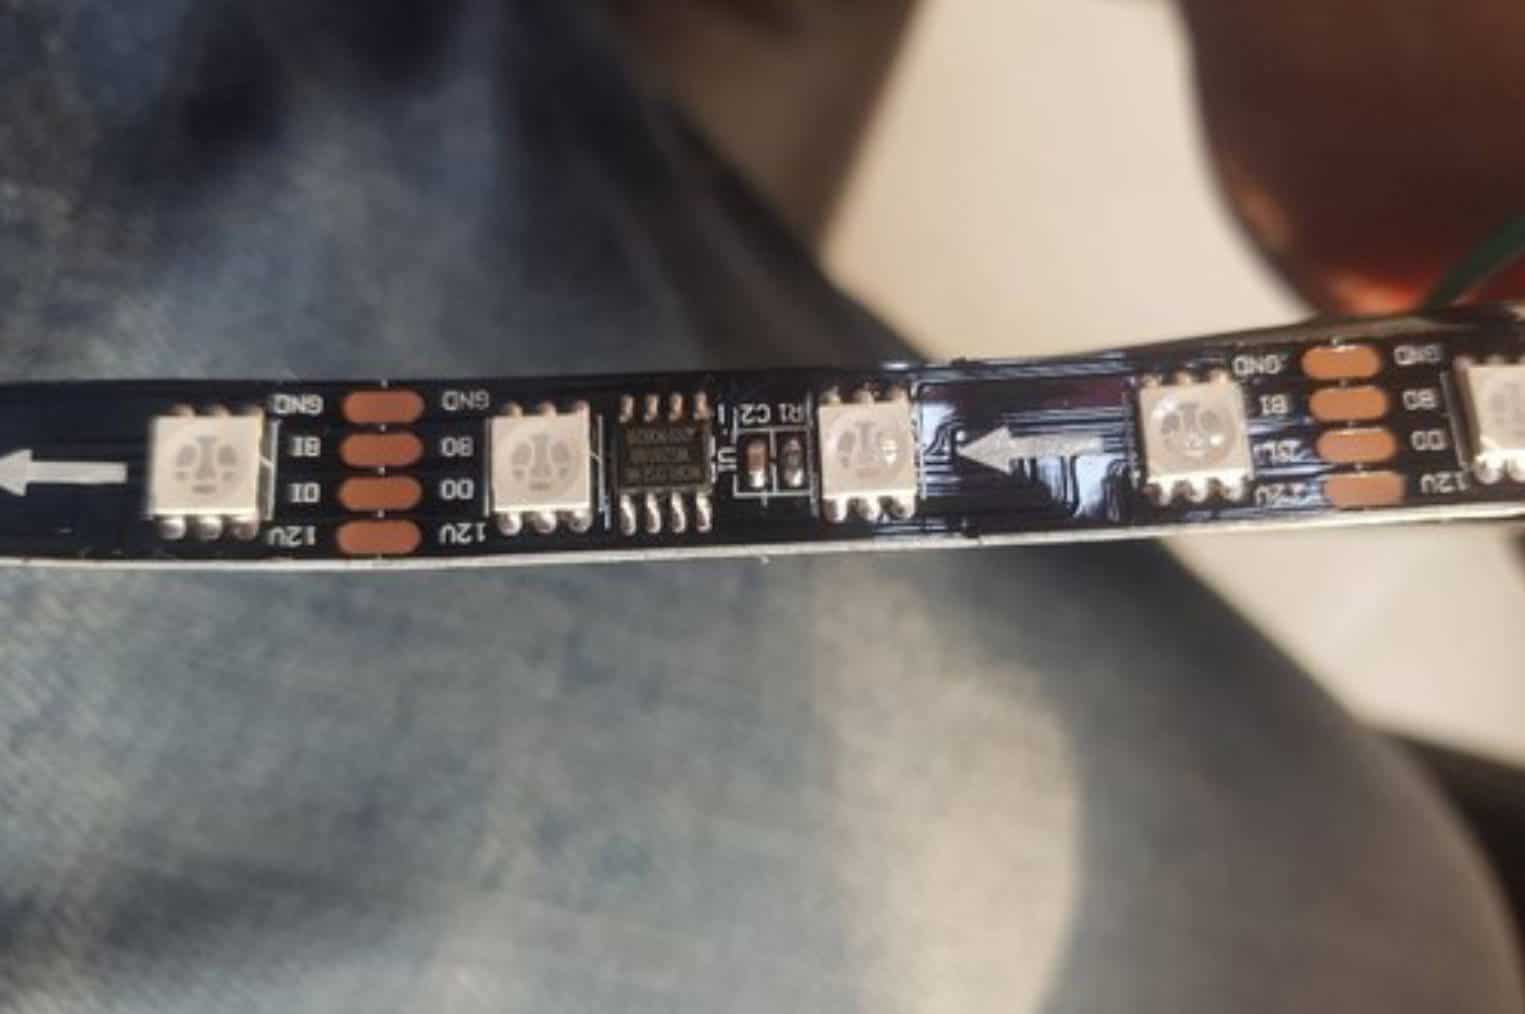
- Find the copper dots before cutting your desired amount of LED light strips. You will need to cut between the pair of copper dots. If you cut your LED light strips randomly, some lights wouldn’t work at all.
- You can cut the LED light strips with scissors once you find the correct measurement and spot between the copper dots. Most LED lights have a designated cutting mark between the copper dots, so you will have a guide on where to cut on the strip.
Now that we know how to cut a LED light strip, let’s get into the steps to connect them correctly.
LED Light Strips Connector
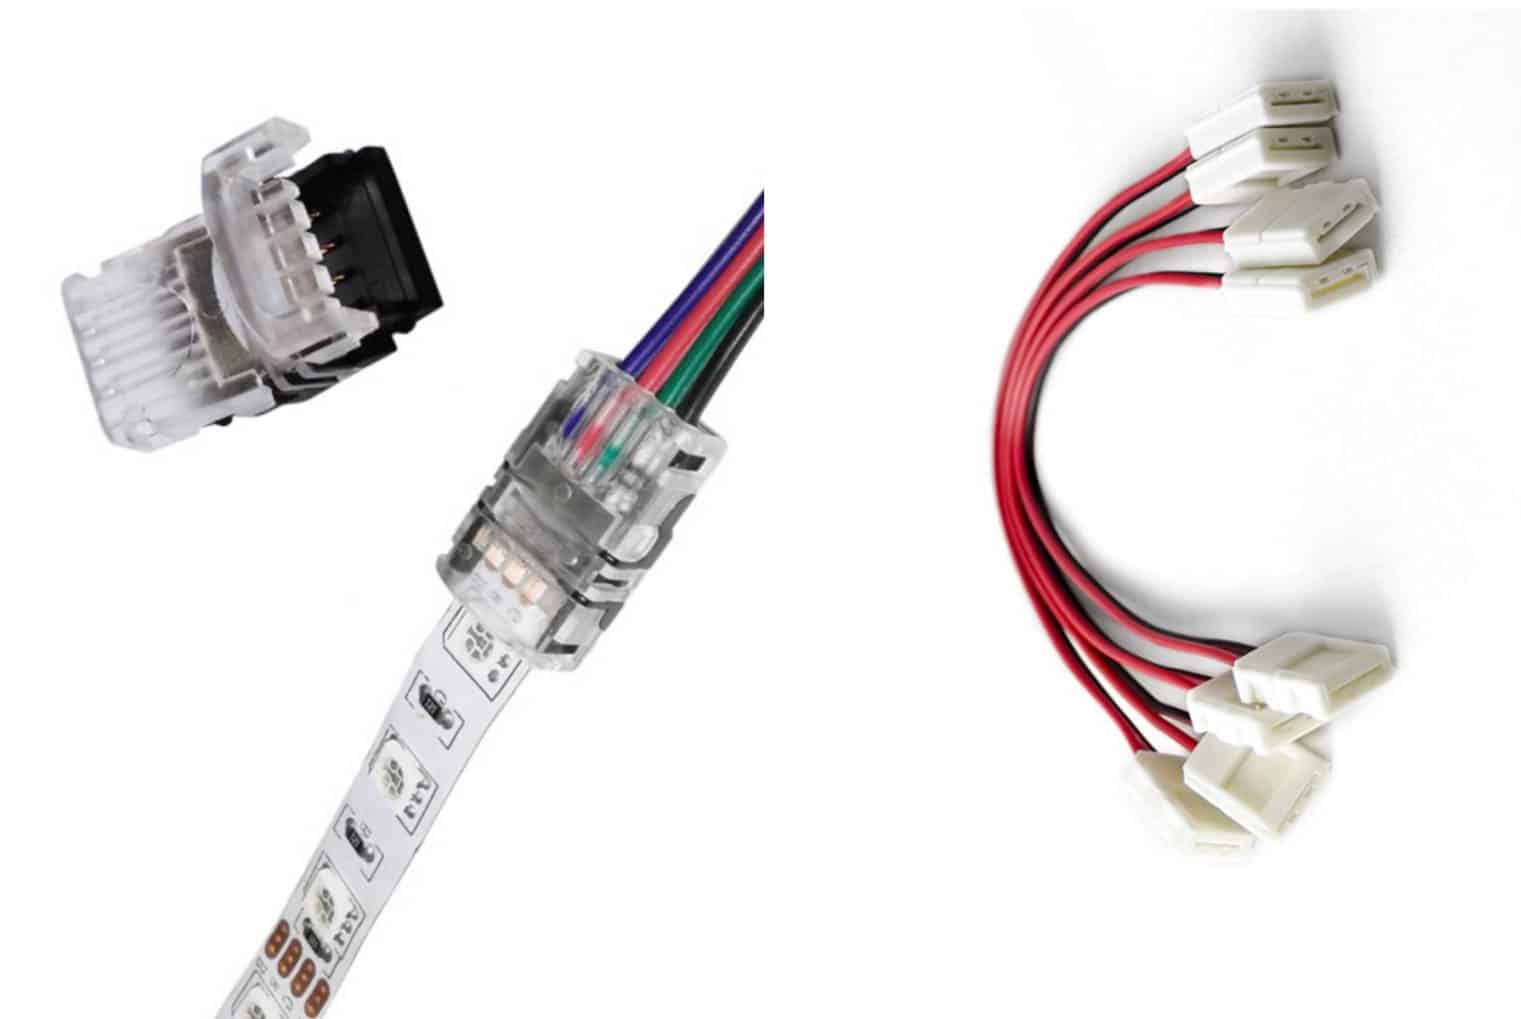
One of the easiest ways to connect LED light strips is by buying a connector designed to join them. You won’t need any equipment or process other than the connector itself.
There are two types of LED light strip connectors that you can choose from, such as:
- Standard LED Strip Connector: The LED strip connector is the most straightforward type of connector. You wouldn’t have any kind of wiring present in the product. It’s a white square-shaped connector with two latches for inserting and securing your LED strips.
- LED Light Strip Wire Connector: The design is a bit different compared to a straight-up connector. As the name suggests, a wire is present between the two latches. This type of connector is excellent for maximizing the length of your LED light strips.
Between these two types of LED strip connectors, you will have to choose between two versions of the latch:
- Clip-On: With a clip-on LED light strip connector, you will stick the copper dots inside, and they’ll be connected. It’s perfect for smaller LED light strips.
- Fold Over: A fold-over light strip connector is the one with latches you can open. They are often meant for larger RGB LED light strips.
If you don’t know which connector to use, you can buy a set like this for a low price. If you buy a few individual pieces of a connector, make sure to check if your LED strips are 4-pin, 3-pin, or 2-pin to ensure that you purchase the connector that will suit you.
There are also different connectors for the colors that your LED lights produce. You can easily search for references online for which one is the best for you.
How to Put on a LED Light Strip Connector?

If you are looking forward to using any connector, you can follow these four easy steps to connect your LED light strips.
Things you’ll need:
- LED Light Strip Connector
- Measuring Tape
- Scissors
- X-Acto Knife or Cutter
Steps:
- First, measure the place or thing you will out your LED light strips. Since most LED light strips come with a predetermined size (5-10 meters), you need to ensure that you will have the right amount of light strips at your disposal.
- After measuring, use a scissor to cut the light strips according to the correct measurements. If your light strips are enough, you can go to the next step.
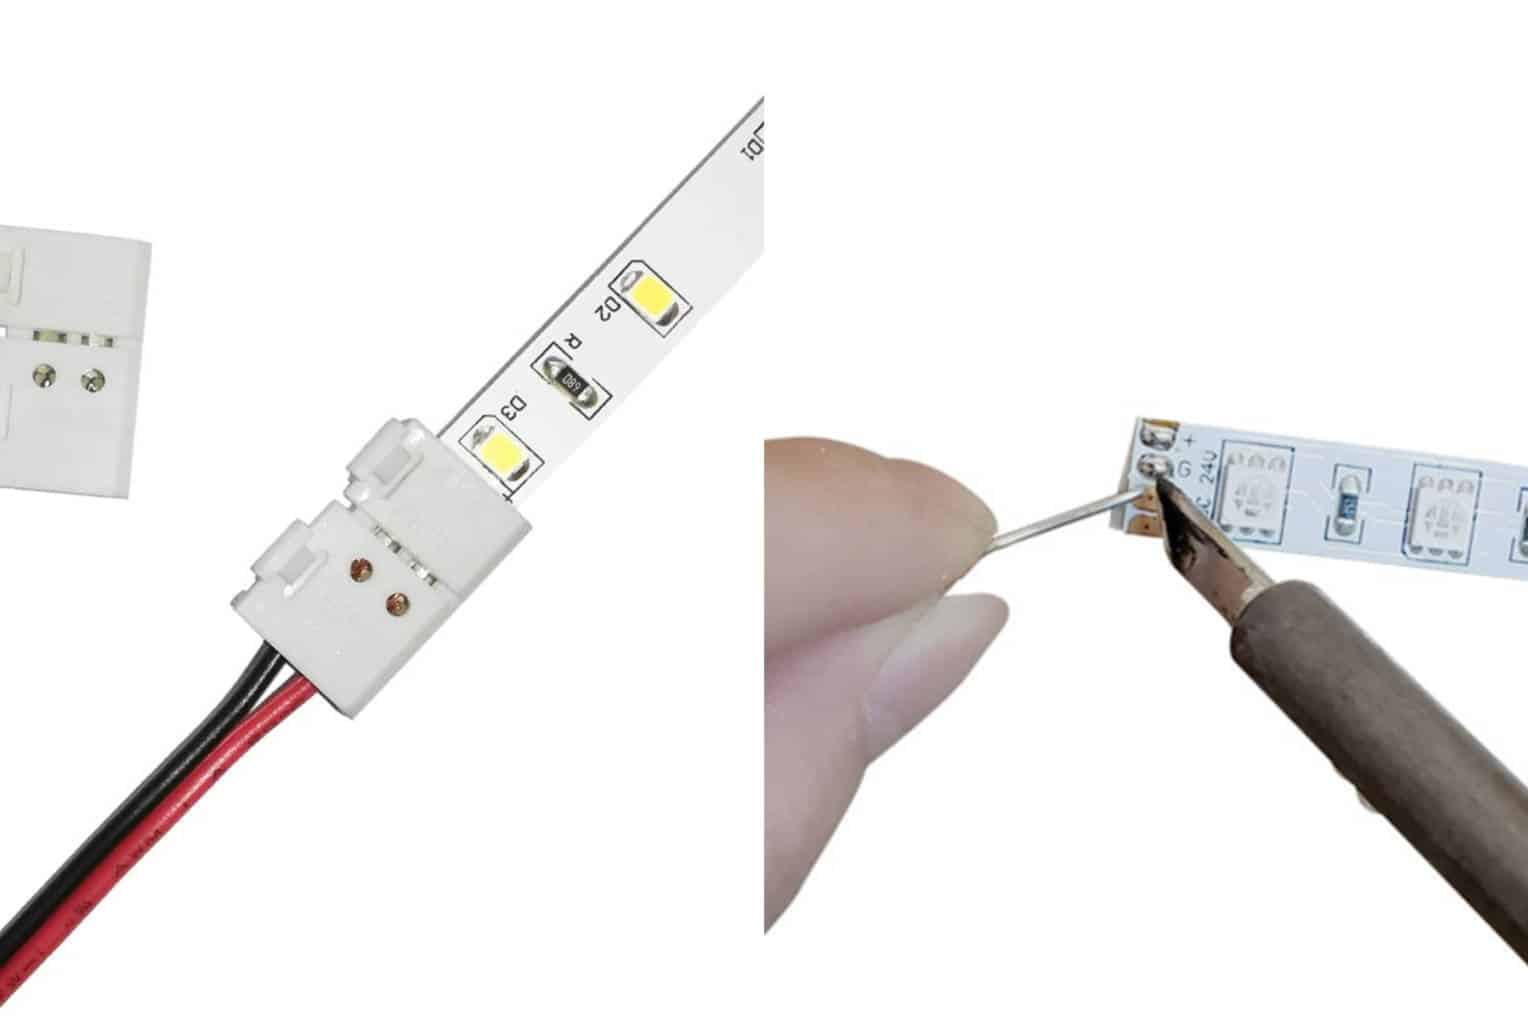
- Open the latch and ensure that both your LED light strip is set up correctly. The letters should be appropriately aligned with the other light strip you will connect. There is a written label that goes 12V, R, G, and B. Make sure that your placement is the same with both of your strips.
- Gently insert the LED light strip on the connector. If you have difficulty inserting the light strips under the connector, you can use a cutter or x-acto knife to lift the connecting metal inside the connector gently.
- Then, make sure that the light strip is secure before closing the latch.
- Do the same steps to connect the other end of the light strip.
- That’s it! The process is very quick and easy to follow. If you still have difficulties following the steps above, you can watch this step-by-step video.
- If you are using a clip-on connector, you need to align the wires and gently insert the LED light strip.
Soldering LED Strip Lights

Connectors can be quick and cheap, but they aren’t always the best method to go for. With an LED light strips connector, your lights can have a limited amount of power source.
If you are going for more significant projects, soldering your LED light strips might be the best option for you.
Soldering is a process in which one would use solder to connect metal with higher melting points, such as copper wires. You can have a more even power distribution by soldering your LED light strip together.
Unfortunately, this method is more time-consuming and less cost-effective. Soldering is designed for more extensive projects or when LED light strips connectors are unusable.
How to Connect LED Light Strip by Soldering?
As stated above, with soldering, you will need to use more products, such as:
- Soldering Iron
- Solder
- Multi-Conductor Wire
- Wire Cutter
- Liquid Glue
Steps:
- First, remove a small part of the wire. We recommend removing around a centimeter of the wire’s protective coat.
- Heat the soldering iron. Then, heat both wires.
- Melt the solder on and coat the exposed wires.
- Put your LED light strips in place. You can do this by using a non-abrasive tape of metal clamps.
- Same with the wires, heat the connecting metal of the LED light strip. To ensure that the chip near the connector doesn’t get damaged by the heat from the soldering iron, you can protect it by using plastic or battery clamps.
- Melt the solder on the connecting metal of the LED light strip. Ensure that the solder will thoroughly stick to the light strip and make sure that no debris or dirt blocks the metal.
- With the soldering iron, connect the wires to the LED light strips.
- The next step is to secure the connected wire and LED light strip. You can use electrical tape to secure and protect the connected cables and LED light strip. Although, using liquid glue is also an option to secure the LED strip.
That’s it! That’s how you can easily solder together your LED light strips. If you have trouble following these steps, a video instruction might be for you.
Connectors or Soldering: Which is the Best Connecting Method for You?
Both connecting methods have their pros and cons. To better help you with your decision, let’s see an overview of their advantages and disadvantages.
Pros and Cons of Connectors
Pros | Cons |
● Time-Efficient ● Cost-Effective ● Easy to Do | ● Cannot be used for more significant projects ● Have limits in voltage ● Not energy-efficient |
Connectors are the easiest method of connecting your LED light strips. Although, as accessible as they are, connectors have limitations in distributing power throughout the light strip.
It might not be visible for small projects such as bedrooms, but if you are going to do more significant projects with your LED lights, soldering is the better method for you.
Pros and Cons of Soldering
Pros | Cons |
● Energy-Efficient ● Great for Bigger Projects ● More Durable | ● More Costly ● Needs Technical Skill |
Soldering is a more durable method of connecting your LED light strips. There is a significant disadvantage, though.
It’s tough to do if you are not well-versed with soldering metals. Letting a professional is always an option, especially for big projects that require many connectors and energy.
If you are looking forward to putting LED lights in a bedroom, for example, measuring your needed LED light strips before buying is a great way to minimize the amount of connecting you’ll do.
In Conclusion
Dealing with products such as LED light strips can be challenging, especially if you are not savvy enough to know how to do it properly. Choosing between the two methods is a big decision, so be sure to take your time.
We hope this tutorial on how to connect your LED light strips is helpful. If you have questions about LED lights, be sure to comment down.